| How Does Your Garden Grow? Give Your Garden a Healthy Start | ||
| by Sarah Galbraith | ||
| There are no gardening mistakes, only experiments. —Janet Kilburn Phillips, gardener | ||
May is for planting in Vermont. If you’re a vegetable gardener, these longer days and the more direct sunlight and warming temperatures have got you looking at seeds packets at the store, pulling out your seed-starting supplies, and putting upcoming seedling sales on your calendar. Although planting is an important part of gardening, there is much to be done to get your garden ready before the plants go in it. Successfully growing vegetables can take planning, precision, and perseverance—and a good deal of luck as well. While gardeners are on their own in the luck department, there are a number of things backyard growers can do to get their garden off to a good start. Healthy soil is at the base of any good garden. For vegetable growers, the plants are very simply converting the nutrients in your soil into forms that can be digested by our bodies via nutrient-dense food. Healthier soil produces higher-quality food and plants that are better able to withstand pests and disease; and they taste better, too. |
|
|
| Every home gardener should start the spring off with a soil test (if this wasn’t already done last fall). The University of Vermont Cooperative Extension has a soil-testing lab in Burlington where gardeners can send soil samples for testing for $12. Instructions and accompanying forms are on the lab’s website (www.uvm.edu/extension/yard). The soil characteristics that are of primary concern for home gardeners are acidity, nutrient content, and organic matter. The soil test will address all of these. You can also test for the presence of lead for an additional $10. | ||
|
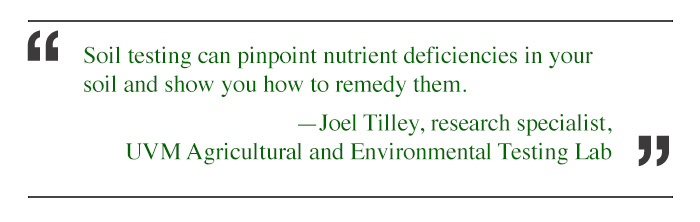
UVM Extension’s website includes instructions for taking a soil sample, but in general the guideline is to take a sample that is representative of the entire area you wish to evaluate and plant. This can be done by taking core samples from several spots in your garden with a special tool or using a trowel technique and mixing them together in a clean bucket; your final sample should be pulled from this mix. Joel Tilley, research specialist at UVM’s Agricultural and Environmental Testing Lab, says “soil testing can pinpoint nutrient deficiencies in your soil and show you how to remedy them. A soil test will show you if you need to add lime to raise the pH of a soil that is too acidic. On the other hand, if your soil has adequate nutrient levels and pH, the test will show that you don’t need to add anything, which saves you money and prevents excess nutrients from polluting lakes and streams.” The acidity or alkalinity of your soil, measured on the pH scale from 1 to 14, affects the ability of your plants to take up the nutrients in the soil. Your soil may have ample nutrients, but if the pH is wrong, the plants cannot access these nutrients for growth and vegetable production. The results of your soil test will help you pinpoint if soil acidity is a problem. Ideally, pH should be between 6.5 and 6.8 for vegetable gardeners. Higher pH can be amended by adding sulfur and lower pH can be remedied by adding limestone. The results of your soil test will tell you which is needed and how much. |
|
The soil test evaluates the presence of nitrogen, phosphorous, potassium, calcium, and magnesium. These can be provided in ample quantities simply by mixing organic compost into your soil in the spring. But the soil test will tell you which nutrients, and in what quantities, you should add to your soil, if you want to get specific. Finally, the soil test will also alert you to any shortcomings in organic matter. The right balance of organic matter is important to maintain optimum soil moisture and oxygen levels. It also adds nutrients to the soil as it decomposes. Organic matter can be improved by adding compost or composted manure or by turning over a cover crop. In the spring, gardeners should turn the soil to a depth of eight to 10 inches, breaking up any clumps and removing weeds and their roots and any sticks and stones you come across. Work the soil like this once or twice each week before planting time to kill early season weeds and continually work out any clumps or unwanted debris. Regularly work organic compost into the top six to eight inches of soil to maximize the soil’s fertility, leading to more productive plants and more nutritious and flavorful produce. |
|
|
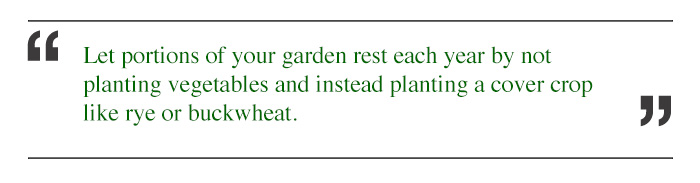
Cover crops are plantings of one or two varieties of legumes, grasses, or buckwheat over an entire bed or plot. They add nutrients and organic matter to garden soil, and their roots break up the soil to improve air flow and water movement between soil particles. They also crowd out weeds, and their roots hold the soil together to prevent soil erosion. One of the best ways to incorporate cover crops into your home vegetable garden is to plant them in the spring before planting summer vegetables. For example, peas and oats can be planted in the spot that will become tomatoes or potatoes later in the growing season. High Mowing Organic Seeds (www.highmowingseeds.com), based in Wolcott, Vermont, has a page on their website dedicated to cover crops—they’re that important. Paul Betz, sales associate, says, “Growing vegetables is very hard on the soil. Cover crops improve tilth [the overall condition and suitability of a soil for crop growth] and add soil microorganisms and are a great way to protect the soil.” Seeds are planted simply by broadcasting them over the whole soil surface and raking them in to the top one to three inches of soil. In plots that will become a summer crop, the plants should be chopped down with a lawnmower or weed whacker after the plants flower but before they seed, and everything should be left in place to brown for a day or two. Then, turn the plant material into the soil thoroughly so that is can decompose and add wonderful nutrients to your soil. Vegetables can be planted two to three weeks afterward; no sooner, because the decomposition of this plant material makes for poor growing medium for a short while. In plots that are resting for the year, cover crops like rye or buckwheat can be planted and left to grow throughout the season. Cover crops can also be planted after another crop is done growing. For example, later in the summer after your early season crops, like lettuces, spinach, and radishes, have finished, gardeners can plant a cover crop to restore the soil. Cover crops can also be planted in the fall up to four weeks before a killing frost. |
||
 |
||
|
Gardens can be round, square, big, or small; they can be raised beds or the traditional in-ground garden. Regardless of your type of garden, it’s best to lay it all out on paper before planting. Using the dimensions of your actual garden, plot out the space and where each type of plant will go. Good planning will help you make the most of your space and will determine how many of each plant you will need. Whatever your planning method, there are important design considerations to keep in mind. For one, plants have preferences for their growing conditions, suchas amount of light, soil moisture, access to pollinators, and—importantly—space. A lettuce mix, for example, can be broadcast over a square foot space in the shade of some taller tomato plants; summer squashes need about one square foot each; beans should be given space to climb; and winter squashes, cucumbers, and melons need space to grow long vines along the ground. Trellising can also be used to support cucumbers, melons, and squashes to encourage them to grow up rather than out. |
|
From year to year, plants should be rotated through the garden because soil pests and diseases overwinter in the soil. These pests are often specific to certain plant families, so it is important to avoid planting plants of the same family in the same location two years in a row. For example, don’t plant the broccoli in the same place you planted the Brussels sprouts last year; they are in the same family and are affected by the same diseases and pests. Healthy plants that are free from disease and pests will produce plentiful and attractive produce. Succession planting adds a layer of puzzle making to garden planning and can be very exciting and rewarding. In succession planting, various methods are used to rotate crops and recycle space to make maximum use of the growing season. It can be as simple as leaving room to plant a new row of beets every three weeks, for example. Similarly, lettuces can be planted every three weeks so that your garden is always full of perfectly aged, salad-bowl-ready greens. It can also be more complex: a single plot can be started as spinach, then cover cropped, then planted with tomatoes, and finally, after the temperatures become too cool for tomatoes, those plants can be removed and the plot can be replanted with lettuce. Leave space in your plan to add new rows of crops throughout the season or plan for plantings before and after other crops. Good candidates for succession planting are lettuces and salad greens, spinach, beets, carrots, beans, and peas. |
||
With soil growing healthier by the day and your best plans laid, it’s time to buy the seeds and grow or buy seedlings. Plan to plant spring plantings as soon as the soil can be worked; plants like peas, greens, kale, and chard can tolerate the cooler temperatures and even a frost or two. Heat-loving plants like tomatoes, potatoes, bell peppers, cucumbers, and eggplants should not go in the garden until the danger of frost has passed and the night-time temperatures don’t dip below 50 degrees. Deciding which plants to grow by seed versus buy as seedlings can be a personal preference, but some plants just do better from seed and homegrown starts, while others are trickier to start yourself and growers may prefer to buy these plants. Lettuces, spinach, beans, peas, beets, carrots, summer squashes, winter squashes, and chard, for example, are quite easy to grow from seed and in many cases do not transplant well, and so should be direct-sowed in the soil. Tomatoes, on the other hand, do much better in a Vermont garden when they come from a greenhouse that produces hardy seedlings with thick and straight stems and big leaves. Gardening in Vermont should always include a contingency plan: in our climate, that is frost protection. Frosts can even occur in June, July, and August, so it is best to be prepared. Frost protection can include overturned milk jugs and recycled clear plastic food containers anchored down over young plants, clear plastic wrapped around plants or a hoop frame, or even sheets draped over plants to keep frost off their leaves. These protective measures should be added in the afternoon or evening when a frost is expected and then removed in the morning for best results. Be sure to have these supplies on hand and, once your plants are in the ground, listen to weather forecasts for frost warnings. Now that your soil is ready, your plans have been made, your materials are gathered, and your seedlings are growing and becoming hardier by the day, you’re ready to plant. It doesn’t get any better than this in the garden. Your plants have everything they need for a healthy start; all that is left to do is wish them luck and chalk any mistakes up to learning. |
||
|
Sarah Galbraith of Marshfield is a freelance writer covering nature and science, outdoor sports, food and agriculture, renewable energy, and people in Vermont. She has many gardening experiments in her backyard.
|
|